
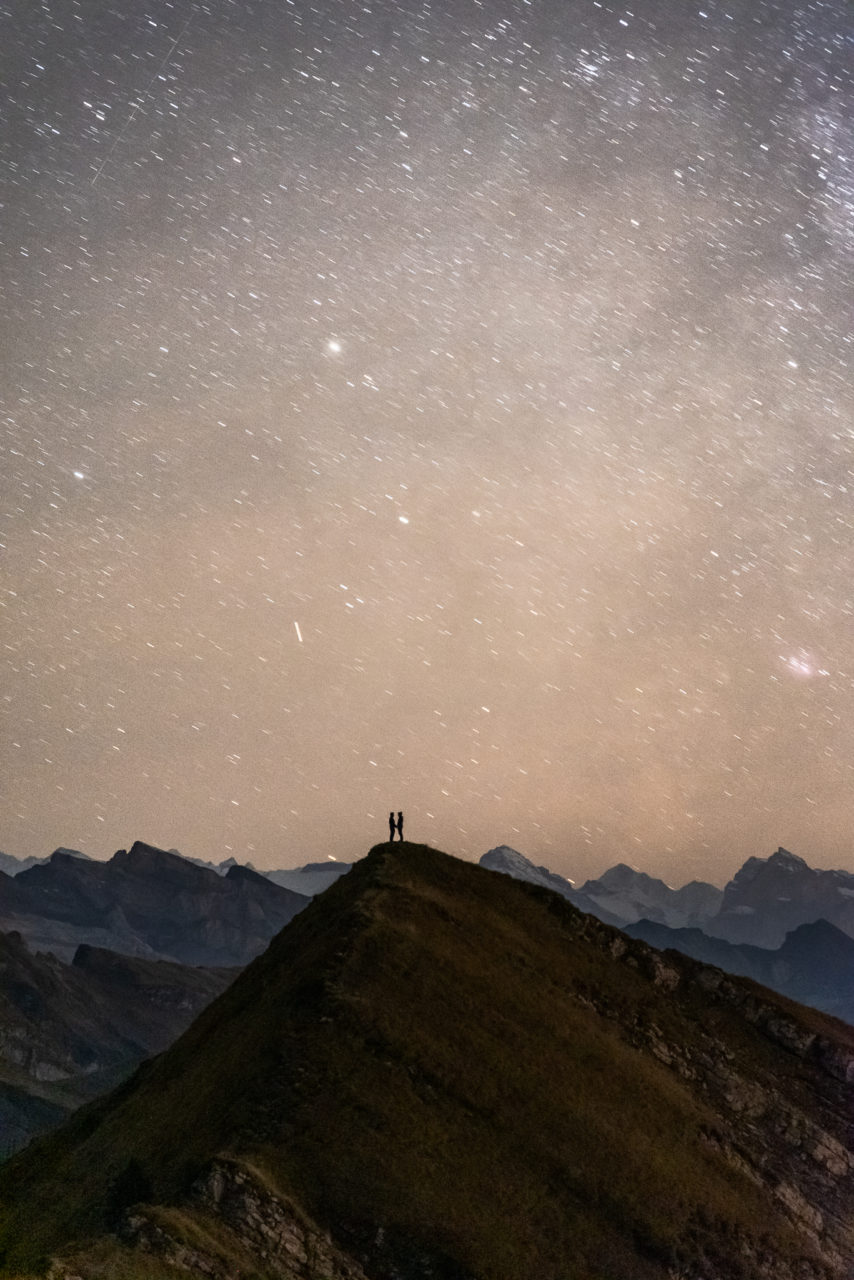
Behind the Shot 1: Together Among Stars
One of the most interesting and informative topics in photography that I love to read about is the workflow and planning process other photographers use to get their photographs.
In this blog post series I will go through some of my own images and talk about how I planned them, what I did to get the shots on location and how I processed them afterwards to get the final outcome I wanted.
To me, getting a photo consists of four steps. Depending on the image, they might be more or less complex but they are always there:
- During the concept phase I come up with the idea of the photo and play around with different variations and options
- After having a clear idea of what I want to achieve, I start planning the when, where and how. Sometimes this process is quite straightforward, other times it takes hours or days to get the details right
- Once I know when and where to be, and if the weather plays along, I’ll go on location and take all the images I need and more to give me options when processing the photos
- Finally when I’m back home, I import all my files and start processing them in Lightroom, Photoshop and any additional tool that I need.
Concept
The idea for this image came to me earlier this year when I first got a star tracker and started doing more complex astrophotography. I began with simple tracked shots, then multi-row panoramas with longer focal lengths and that is when I got the idea. Using a longer focal length for the milky way brings out more color and contrast than with a wide angle lens, but the problem is that the stars also move a lot faster. That is where the star tracker (I’m using an iOptron Skytracker Pro) comes in. By rotating at the same speed as our planet, it cancels out the star trailing and allows for much longer exposures than normal.
My idea was to capture the galactic core of the milky way with a longer focal length, between 50 and 100mm, and having the silhouette of a person in the center of it. I am thankful to have a girlfriend that plays along with these kind of ideas.
Planning
Now that I knew what I wanted, I started thinking about when and where. Ideally I wanted the galactic core rising vertical above the silhouette, meaning the photo had to be taken in late summer or fall, otherwise the milky way was too much at an angle. From experience, I knew that starting in August, the milky way is exactly vertical to the horizon before setting.
Having it vertical before setting means that the core is right above the horizon. This implies two things: First, there would only be about half an hour to get the shot before the core disappeared below the horizon. And second, I needed a spot where the silhouette is on horizon level, but without any tall mountains in the background to block the view.
Going through the location list I’ve built up over the years, I narrowed it down to a few places that would work in September or October. Due to a full schedule, September did not work out and I planned the shot for October, hoping the weather would play along.
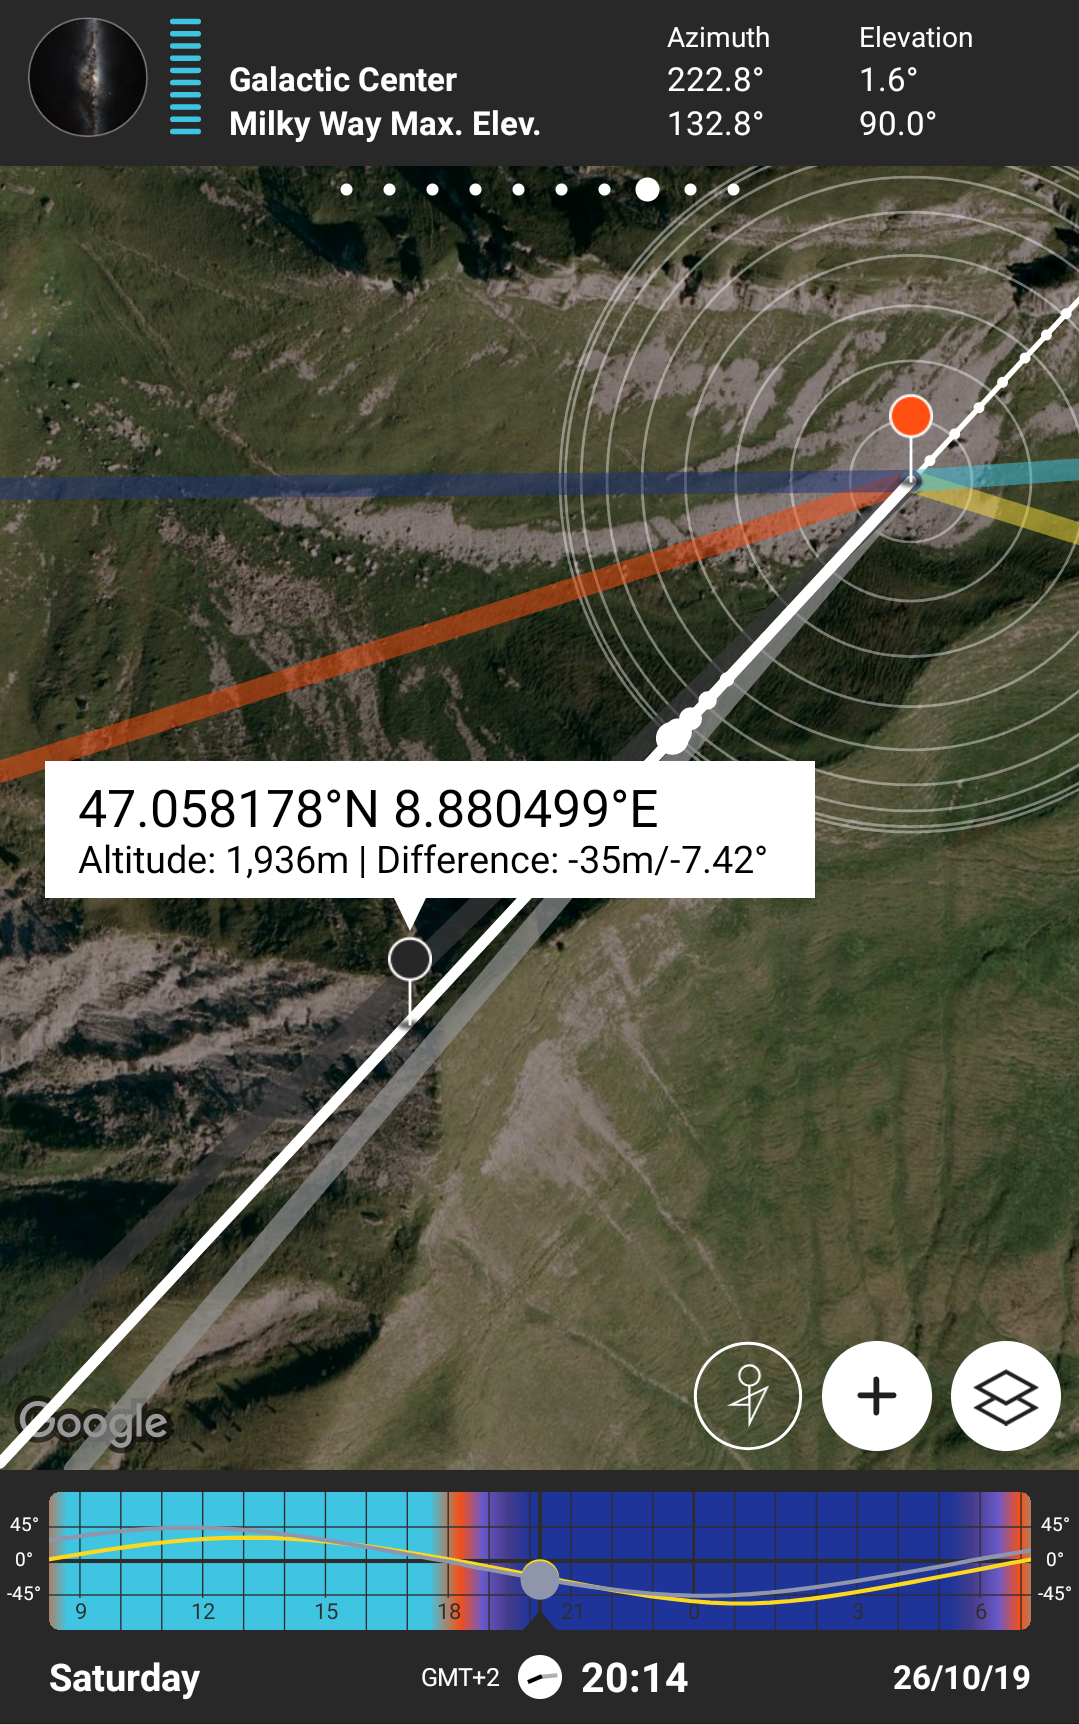
In the following screenshot you can see how I checked my plan using the PhotoPills app that I use for almost all my planning. There are a few things to be noted: First, the date I’ve picked was nearly a new moon night, so there would be no washing out of the stars from the moonlight. Next, the spot I would set up my camera (orange pin) was slightly higher than the spot my girlfriend would stand for the silhouette (black pin). Then, the time I would take the photo (20:14) was after the astronomical twilight ended and true night began, meanining no more sunlight on the horizon. And finally, the milky way core at that time would be at an elevation of 1.6° above horizon, with the maximum elevation of the arc at 90°, which is directly overhead.
Taking the Image
The weekend came, with a forecast of clear skies all night. Everything seemed to go as planned but first we had to get up there which meant hiking up almost 1100 meters of elevation gain.
We arrived on location about an hour before sunset. Although I knew roughly where I wanted to take the photo from, I had to get the exaxt spot correct, so I walked around using the PhotoPills AR mode to align the milky way core with the little hilltop. I have to admit, the place was a bit more precarious than I originally thought. The best spot was in the middle of a steep rubble field coming down from the mountainside of the neighbouring peak.
As I deemed it safe enough, I marked the spot with a stone cairn that I would be able to find in the dark and headed back to capture the sunset, eat dinner and set up the tent.
After nightfall, I walked back to the spot I marked, bringing my tripod, star tracker and camera. Meanwhile, my girlfriend went to the top of the hill so I could get my composition right.
Initially I had planned to use my 50mm f/1.8 lens but due to the terrain the field of view would have been too much for the shot I wanted. Therefore I switched to my, admittedly much less optimal, 24-120 f/4 lens. I’ve never used that lens before for astrophotography, mainly because f/4 is not a preferred wide open aperture and it’s less sharp than one of my primes that I normally use.
First, I had to align my star tracker with the polar star, put my ballhead and camera on top of it and roughly compose my image. As I wanted to stack the sky images to reduce noise, I took about 25 tracked images at 120mm with 30s, f/5.6 and ISO 4000 of the night sky. I used a cable release to take one photo after another so I didn’t have to touch my camera, reducing any chance for camera shake. By the time I took my images, the galactic core had already dipped below the horizon.
For the foreground, I decided that I wanted not just a single person, but me and my girlfriend together as a silhouette. So I sent my girlfriend a text message, asking her to shine her headtorch towards my camera so I could properly focus on the foreground. Then I set the builtin intervalometer of my camera to take a 25 second exposure every 30 seconds for an hour straight. That gave me enough time to walk the half kilometer over to my girlfriend, try a few different poses and then walk back again to check the results.
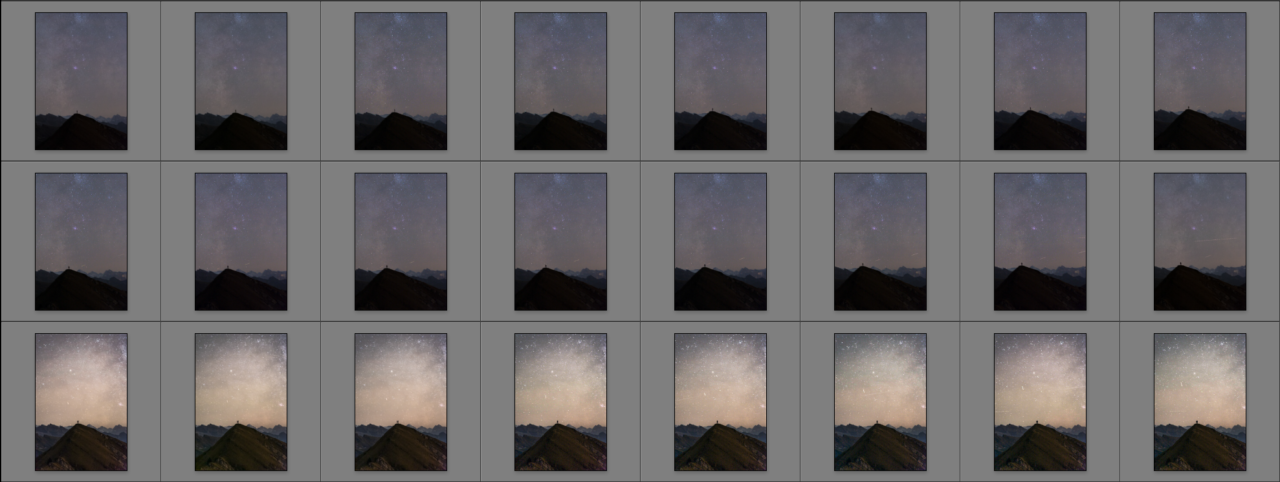
The whole process took roughly an hour and dozens of photos. Of the 100 or so photos taken in that sequence, I selected 16 sky photos and 8 foreground photos to be stacked.
Processing
My processing always starts with the import in Lightroom, where I apply my metadata and file naming preset to all images. For the selected photos, I applied basic exposure adjustments before stacking them.

Stacking night sky photos can be done in Photoshop, but I prefer to use another software called Sequator, because it offers more options and is better optimized for nightscapes. I imported the 16 frames I selected earlier in Sequator, masked the sky and exported the result as a TIFF file.

Stacking the foreground is pretty straightforward in Photoshop as long as the camera didn’t move. I simply opened all frames as layers, created a smart object and set the layer mode to Median.
Having stacked both the sky and foreground, I opened them as layers in Photoshop and started blending them together, using a luminositiy mask which I created with the InstaMask plugin by Jimmy McIntyre.
Now that I blended the parts of my image together, I do a few steps to edit my final image:
- Cloning: Remove distracting elements such as plane lights, dust spots or hot pixels.
- Color correction: This is the part that I dread the most when processing nightscape images. I never know if I want to go for a more blueish look that feels more like I saw it or go for a warmer look which is closer to the color most stars actually have. To change the color balance, I use Camera Raw, Color Balance or the Hue/Saturation adjustment.
- Star reduction: Tracked long exposures pick up so many stars that I often find them distracting from the dust clouds and nebulaes in the milky way. I do this using the Minimum filter in Photoshop.
- Noise reduction: I usually use the noise reduction in Camera Raw and make sure it does not remove any stars in my image that I want to keep and instead only cleans the color and luminosity noise.
- Dodge and burn: To emphasize certain parts of the image, I do some selective dodging and burning, either with the Photoshop tools with the same name or by applying a curves layer with a luminosity mask.
- Sharpening/Softening: Most of the time I only sharpen the foreground in my nightscape images, for which I use a High Pass filter or Camera Raw. The sky is either left as is or even softened with an Orton Effect or reduced clarity to give the stars kind of a glow.
Final Thoughts
With the total time of planning, taking the images and post-processing, this has to be one of my most complex photos so far. It did not turn out 100% as I wanted it, but it is quite close already. Now that I know what to look out for, I have a few more ideas that I want to try out next year and hopefully get the image that I really want.