Behind the Shot 2: Great Orion Nebula
Once the core of the milky way does not rise above the horizon anymore in October (at least at my latitude in Switzerland), the prime target for any astrophotographers disappears.
However, there are so many more photography targets in the night sky besides the milky way and this winter I finally wanted to try and capture some of them. These Deep Sky Objects (DSO) can be other galaxies, interstellar dust clouds (also called nebulae) or star clusters. Many of those objects appear bigger in the sky than a full moon but are a thousand times less bright.
Concept
Most deep sky objects are photographed on their own, since they require long focal lengths, often times even telescopes and extremely long exposure times to be visible. Many deep sky photographers take images from their backyard, since focusing on a single object is mostly location independent and the gear is often times bulky and heavy.
Given the fact that I live in a city and prefer to be out in the field, I instead want to combine some of those objects with regular landscape photos. That way it shows them in perspective to something we know and can relate to.
My first step was to identify what astronomical objects are visible from my latitude and which ones were big and bright enough to be captured with the 100-400mm telephoto lens that I had. I came up with a list of a dozen objects that I thought to be possible with my current equipment. For each of them I did some research in which directions they rise and set and what time of the year is best to photograph them.
Two of the easiest DSOs to photograph are the Great Orion Nebula and the Andromeda Galaxy, our closest neighbour in the universe. The reason for this is their comparatively large size in the sky as well as their brightness. Both appear larger than a full moon and are bright enough to be seen with the naked eye (albeit without color and much detail).
The closer to the horizon a DSO is, the more distorted and washed out it is due to Earth’s atmosphere. Therefore I needed to find suitable mountain peaks that I could photograph from the right direction and the right altitude difference to match the DSO altitude in the sky.
When planning for anything astronomy related, there are two important numbers: the azimuth and altitude of an object. Azimuth describes the cardinal direction of an object in degrees, where 0° is north, 90° is east and so on. Altitude describes at which angle relative to the horizon an object is. 0° would be exactly on the horizon and 90° exactly overhead. With both these numbers for a given point in time, an object can be precisely located in the sky
Planning
From my research I knew that the Andromeda galaxy rises in the northeast and sets in the northwest, while the Orion Nebula rises in the southeast and sets in the southwest. The best altitude to photograph them I figured was somewhere between 10° and 20° above the horizon. Anything above that would be hard to photograph with a mountain peak (unless standing right below it) and anything below that would have too much atmosphere and light pollution interfering.
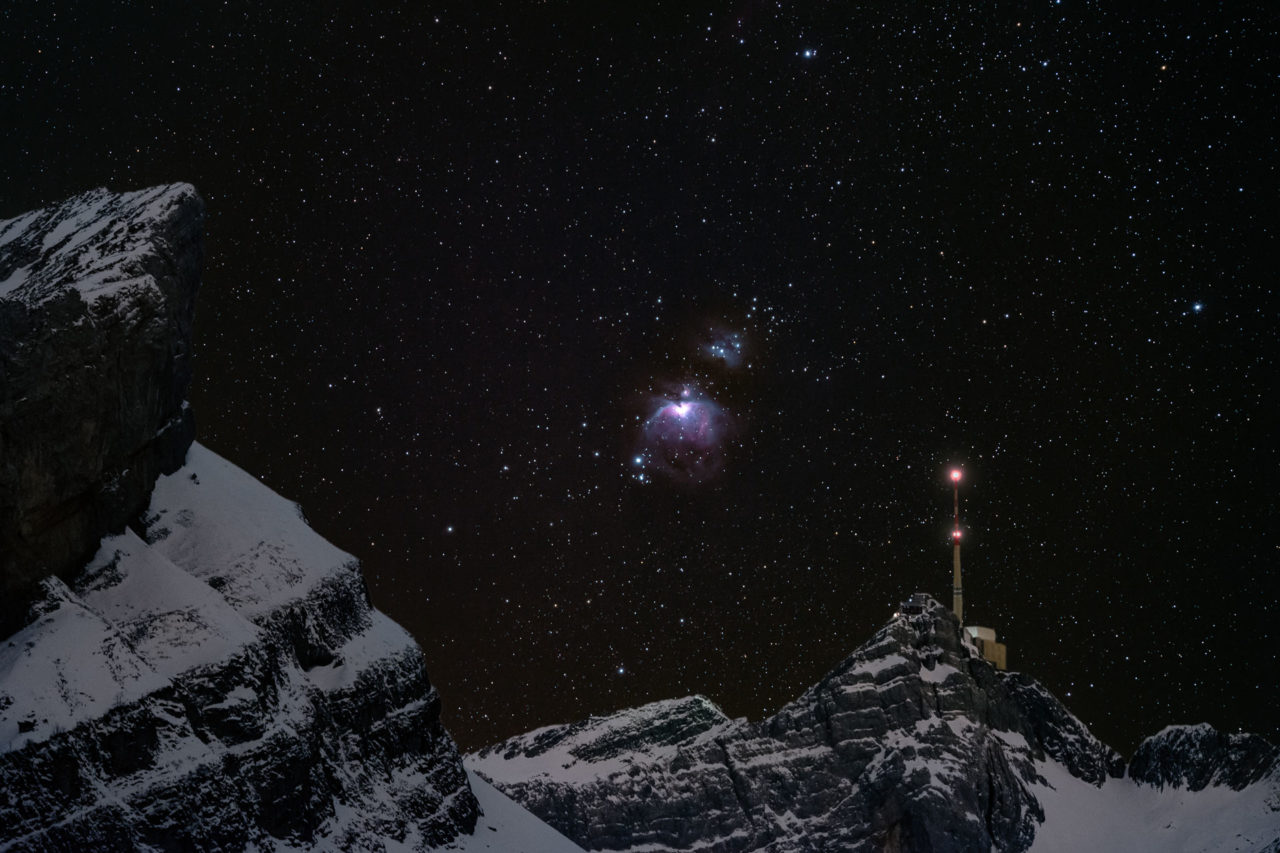
I soon found a suitable target for the Orion Nebula, the mountain peak Säntis in the Alpstein region in Northeastern Switzerland. With a few different applications, I came up with a specific plan on when and where exactly I had to be to get the composition I wanted.
The first thing I needed to know was the altitude difference between where my camera would stand and the peak of Säntis. The Photographer’s Ephemeris and PhotoPills are usually great apps to compare two locations with each other, but they lack the accurate data for mountain peaks. For example, PhotoPills shows that Säntis is 2421m high, while the real number is 2502m. That difference of 100m is crucial when working with long focal lengths. A better tool for this kind of data is PeakFinder, which gives a visual image of how the surroundings look like with more accurate altitude numbers. According to this tool, the peak of Säntis would be at an angle of 15.3° compared to the camera position I chose. Considering the field of Vvew, I wanted to have the Orion Nebula at around 17.0°.
And to be 100% sure I got the right angle, I double-checked with a simple trigonometry calculation.
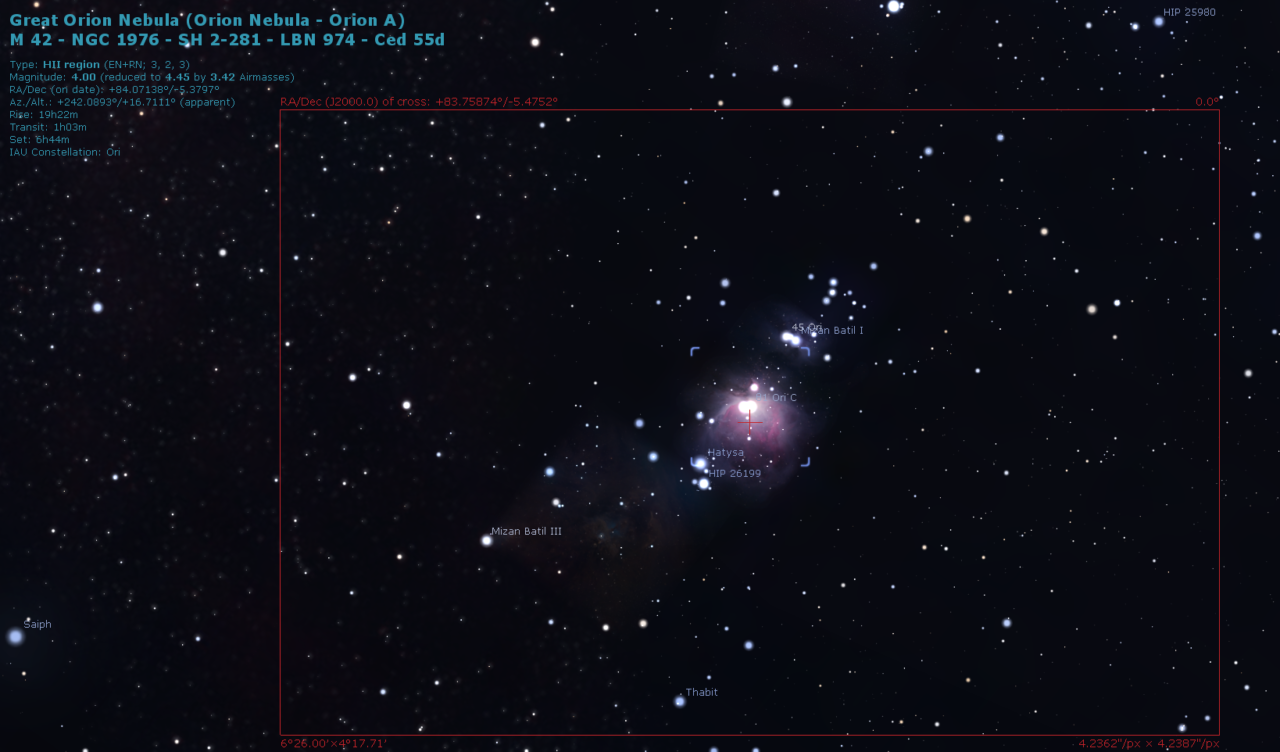
Once I knew at what altitude the Orion Nebula had to be, I checked in Stellarium at which azimuth it would be when reaching 17° of altitude. According to Stellarium, the nebula would be at 242.0° azimuth and 17.0° altitude at 04:57 the day I wanted to take the photo.
Knowing the exact location and time I had to be there, I could wrap my head around the focal length I wanted to use. With 100mm the nebula would be too small, while on 400mm the mountain peaks would be too prominent, so I had to find a balance. I did a quick drawing of the various focal lengths on top of the PeakFinder graphic to see which one would fit best. The field of view values were calculated with the PhotoPills app.
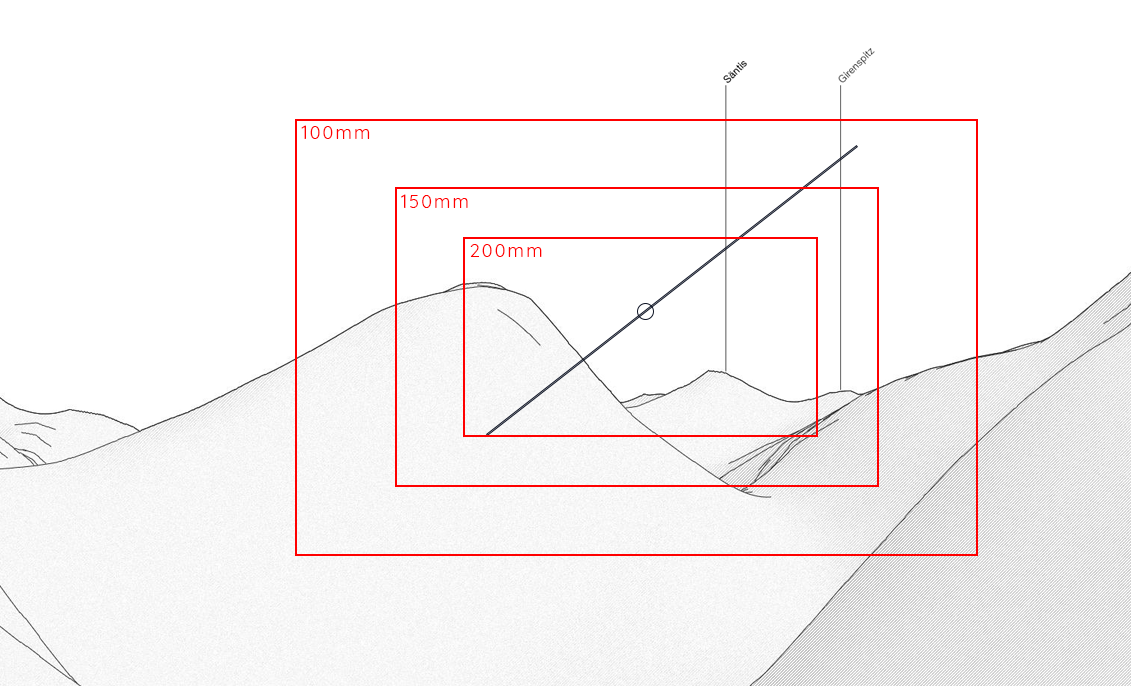
Based on this, I decided on 200mm, to get the Orion Nebula nicely in between the two mountain peaks. I could always change it on location when I saw the first test shots.
Taking the Image
The weather had been very overcast and cloudy for weeks, so I jumped at a three-day window of clear skies when it came. Unfortunately, those days were during the week, so I took the decision to leave after work with the car, take the photo (actually I had four photos planned in total, but that will be the topic of another post) and go straight back to work in the morning.
I slept in the car until 03:00 and started to hike up to the lake, arriving at 03:45, giving me plenty of time to set everything up, take test shots and start exposing for Orion. After making sure my tripod was solid (which wasn’t so easy with 15cm of fresh snow) and the star tracker was properly aligned, I started to compose my image. Since I was using a star tracker that rotates my camera along the same line that Orion (or any other star for that matter) is moving, I could simply frame the foreground, knowing that Orion would eventually come into the photo.
As soon as I had the foreground framed, I unlocked the panorama plate on my ball head and rotated the camera until the Orion Nebula appeared in the liveview. I centered it in the frame and locked the panorama plate again. At that moment, the Nebula was about 45 minutes away from it’s desired spot in the composition. I set the built-in intervalometer to take a 10 second exposure every 12 seconds, which was too short as I realized during post processing.
After 175 frames, the star tracker had rotated my camera back into it’s original composition, so I turned it off and took five long exposures of the foreground. The sky frames were all 10 seconds, f/5.6 and ISO 1600, while the foreground frames were 60 seconds, f/5.6 and ISO 1600.
Thanks to my precise planning, shooting the photo was actually quite straightforward. Since every deep sky object moves along the same axis that earth rotates, it’s very easy to compose such a photo when using a star tracker and a panorama plate. Below you can see an animation of some of the frames that went into the image, all straight out of camera (except for an increased exposure, otherwise they would be too dark to see anything).
Processing
As usual, I imported all my photos in Lightroom, applied a metadata and file renaming preset to all photos and then continued with the following three step post-procesisng:
- Stacking and editing the sky frames
- Stacking and editing the foreground frames
- Blending both parts together
To stack the sky frames I’m again using Sequator, which has worked great for me so far. Since the foreground only consisted of a few frames, I opened them as layers in Photoshop, converted them to a smart object and set the stack mode to Median. Then I opened the stacked sky and foreground as layers and masked them by first creating a rough selection with the Quick Selection Tool and refining it with Select and Mask.
With both images blended together, I already got a feeling of how the image was going to look in the end. To get there I first did some specific adjustments to the sky, the foreground and then some final exposure and color balance changes to both layers.
- Sky
- Per Channel Adjustment: Deep sky astrophotographers often edit their photos entirely on a per-channel basis, which I tried for this photo as well. In the red channel, which was the noisiest in this image, I did some luminance noise reduction with the Camera Raw filter. In the blue channels, I reduced the star size because they were larger than in the other channels, causing them to glow blue around the edges
- Luminance Layer: The red channel contained the most details of the nebula (which is typical for emission nebulae such as Orion) so I copied the red channel, increased the contrast slightly and created a new layer with blend mode Luminosity on top of the image layer. That brought out some nice details in the nebula.
- Curves & Levels: To increase the separation between the black sky background and the nebula, I increased the contrast with a curves adjustment and set the black point lower with a levels adjustment.
- Foreground
- Color Balance: Due to the longer exposure, the colors were a bit different compared to the sky, so I had to do some minor changes with both a Color Balance and a Curves adjustment layer.
- Exposure: To seem more natural, I slightly lowered the contrast and exposure in the foreground to match the sky.
Final Thoughts
Deep sky astrophotography was uncharted territory for me until this photo. The photos I’ve seen of detailed galaxies and vibrant nebulae always striked me more as paintings than photographs. Only now that I tried it myself did I understand what it really takes to capture these wonders of the night sky.
In my opinion, the biggest mistake I did was choosing an exposure time that was too short. I chose 10 seconds to prevent the brightest stars from overexposing, which would give me nicer star color (most stars are yellow instead of blue or white). And while I did manage to get some nice star colors, I lost quite a bit of detail in the Orion Nebula because I intentionally underexposed the whole image.
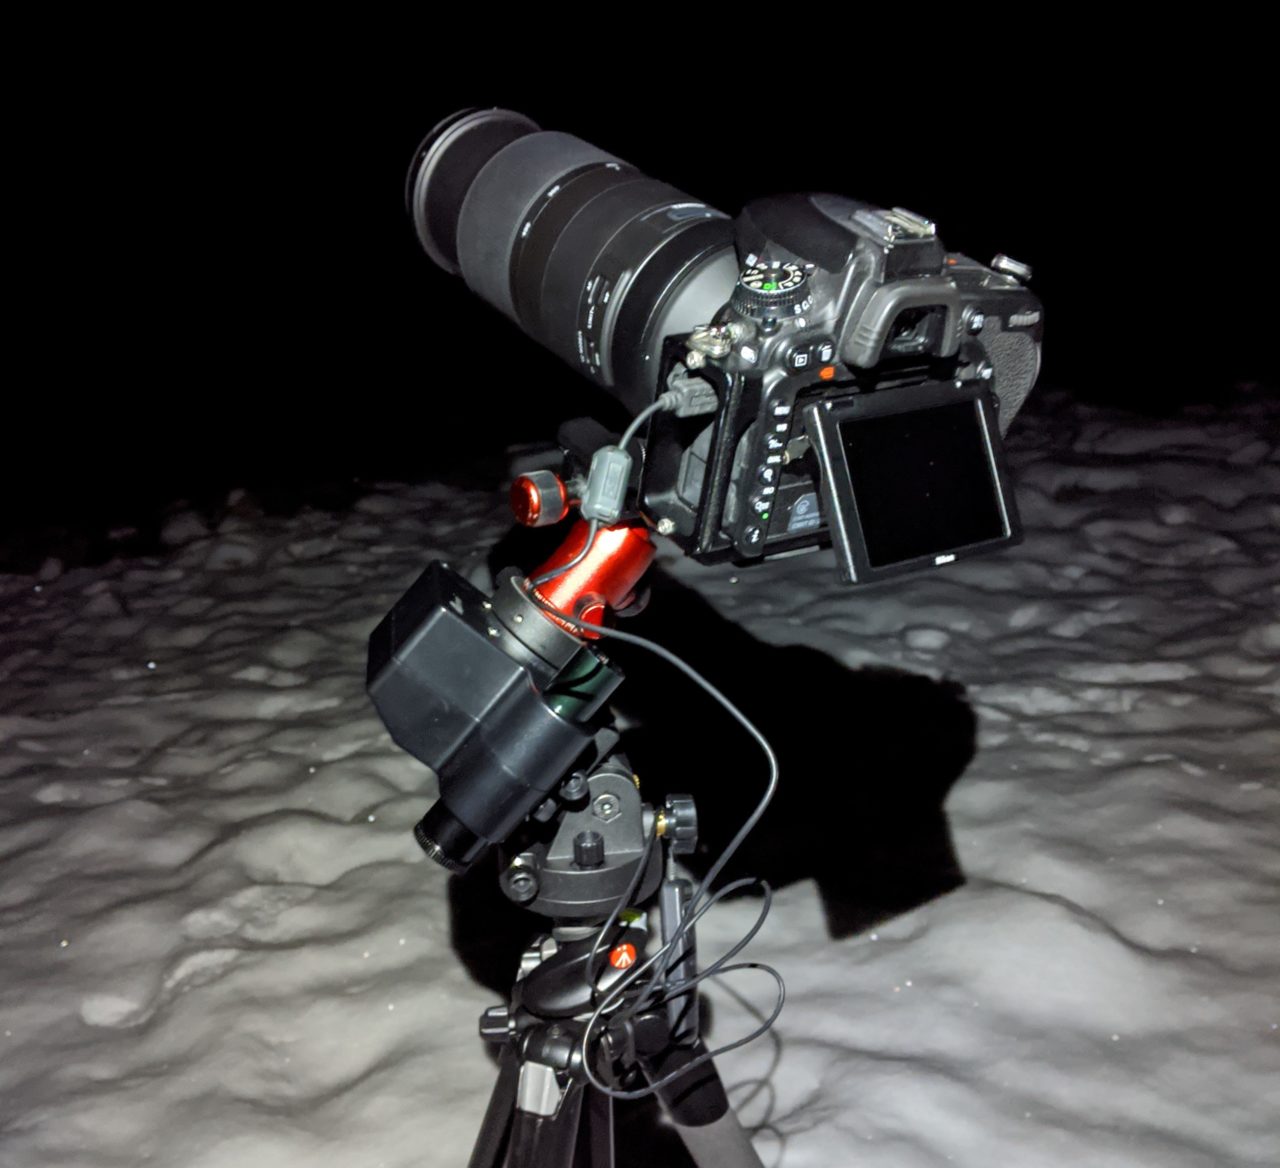
Another issue was that I probably put my star tracker to its limit. The official maximum payload (without a counterweight) is about 1.2kg, while my gear (camera + lens + ballhead + L-bracket) weighs in at around 2.5kg. Really tightening every knob on my ballhead and tracker helped to prevent motion blur but a few frames were still unusable due to a slight camera shake.
Even though I did a few mistakes with this photo, I am very happy with the result and the lessons I learned from this photoshoot.